
ZIF
Cloning Tool | Troubleshooting
FAQ | ZIF
SSD Installation Guide
PATA ZIF SSD Installation Instructions
Learn how to install your SaberTooth Z
series PATA ZIF SSD properly with this illustrated guide. This
guide covers the physical installation of the drive. We recommend
using our ZIF
SSD Cloning Adapter, AUSB-IDE, to quickly and easily copy
the contents of your old drive to your new SaberTooth SSD.
We use a variety of different ZIF (Zero Insertion Force) connectors
on our PATA ZIF SSDs. These photos show how to install each
type. First, the ZIF cable, which should already be included
in your system. You should have a ZIF cable that looks something
like this, with metal connectors on one side and no connectors
on the flip side. Image 1 shows the side with the contacts.
(Acer Aspire ZIF cables may have contacts on reverse sides at
opposite ends).
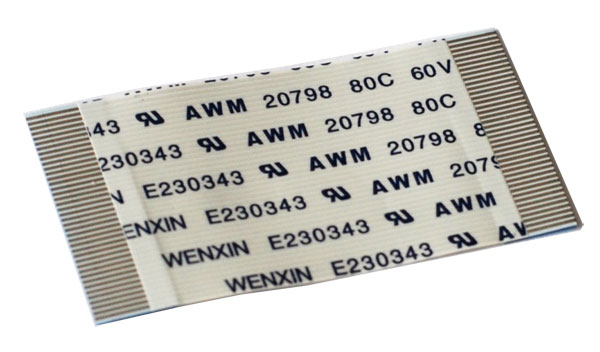
Image 1: ZIF Cable
Some ZIF cables may have a blue tab at one end,
as shown in Image 2 below. The blue tab indicates the cable
is thicker than white ZIF cables. The blue cables may be too
thick to fit in some ZIF connectors. Never force the cable into
the connector as it will result in damage to the cable or the
connector.
Type-1 ZIF Connector
 .
. 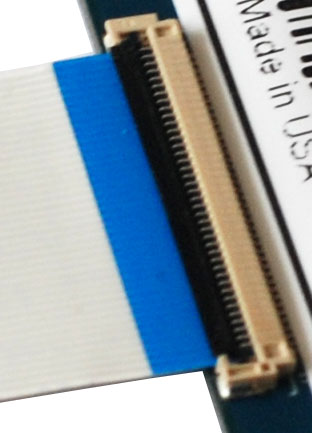
Images 2 and 3: PATA ZIF Connector 1
Images 2 and 3 above show the first type of ZIF
connector, which has a white connector with a black flip lever
that is used to lock the cable in place. First gently flip the
lever up and back. Use your fingernail to flip the lever. Slide
the ZIF cable all the way into the connector, making sure that
the contact fingers are facing toward the PCB, or down as in
these two images. Rotate the black lever down and forward so
it clamps down and locks the cable in place. Be careful with
the black lever as it is fragile.
Type-2 ZIF Connector

Image 4: ZIF Connector Closeup
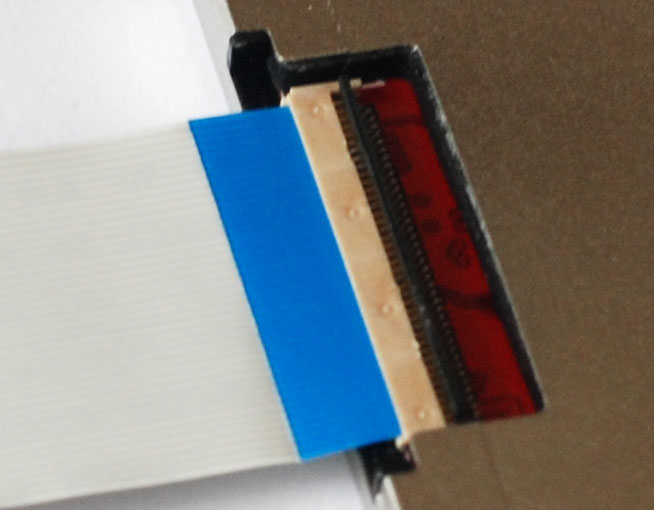
Image 5: ZIF Connector with Cable Installed
Image 4 shows a closeup of the ZIF (Zero Insertion
Force) style connector which is used on many of the SaberTooth
ZX SSDs. This connector has a lever on back to latch the cable
in place. Image 5 above shows correct installation for the ZIF
cable into the ZIF connector. Gently push the cable, with contacts
facing toward the bulk of the drive, into the connector. Be
careful not to crimp the cable. It should fit snugly into the
connector. After the cable is inserted clamp the black lever
on the back of the connector down to latch the cable in place.
Type-3 ZIF Connector
Image 6: ZIF Connector with White Lever

Image 7: ZIF Connector with White Lever Closeup
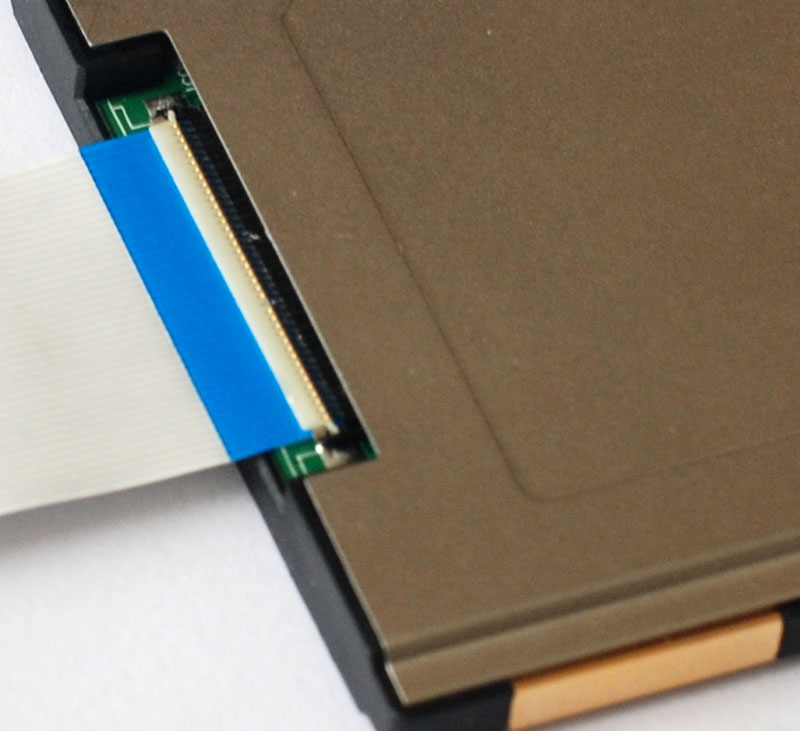
Figure 8: ZIF Connector with Cable Properly
Installed
Figures 6 and 7 above show the ZIF connector
with white lever that is used on many SaberTooth ZX SSDs. First
flip the white lever up and back, as shown in figure 7. Slide
the ZIF cable all the way into the connector, with contacts
facing away from the white lever and toward the bulk of the
SSD. Gently clamp the ZIF lever forward and down to clamp the
cable in place. This is sometimes tricky with this connector
as the white lever can be hard to access when it's open. Use
your fingernail or a toothpick or paper clip to reach the connector.
Figure 8 above shows the ZIF cable installed properly. Figure
9 below shows the wrong way to install the cable.
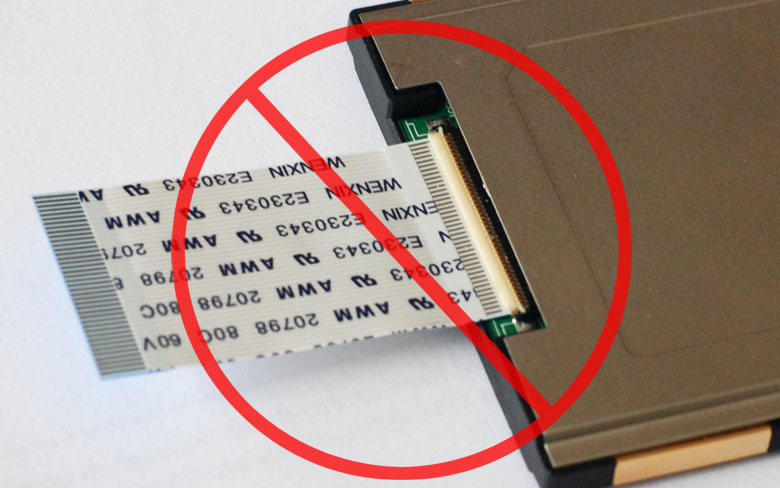
Figure 9: ZIF Connector with Cable Installed
the Wrong way
|